
We like to keep our users informed about the functions and features of Data Innovations products that can make some tasks much easier.
Our products have so many capabilities that it can be hard to keep track of all of them so we share "Did You Know?" messages with our customers and business partners that explain how they can take advantage of features that are already right at their fingertips and can increase productivity. Afterwards we post them here so you may reference them whenever you may need to.
Using Instrument Images in Instrument Manager
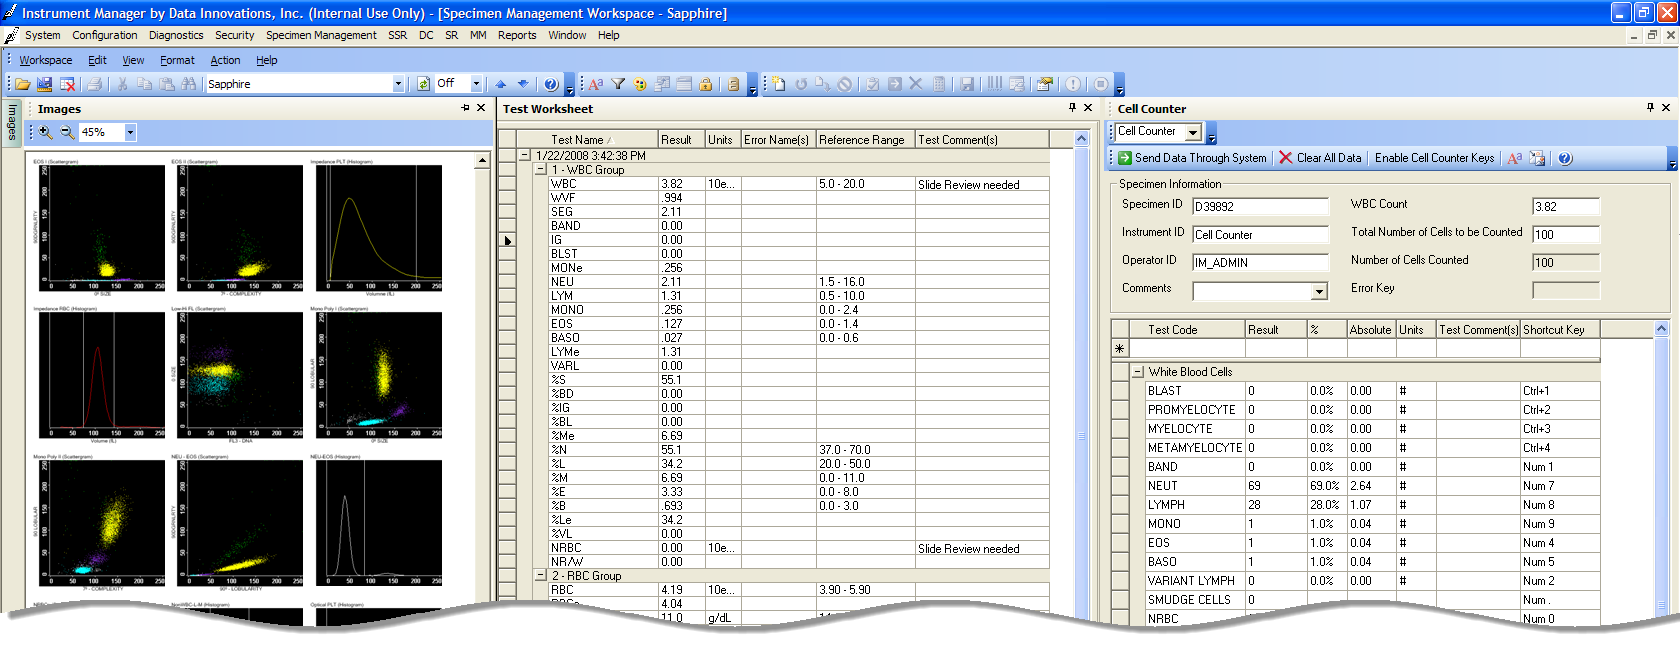
Did you know that Instrument Manager can retrieve images from the leading Hematology instruments such as Sysmex, Beckman Coulter and Abbott, as well as a variety of other instrument types such as Electrophoresis and automated Blood Screening? These images, such as scattergrams, can be viewed along with the other diagnostic information in Specimen Workspace using the Image pane to provide a holistic view of the specimen information. In addition, the images can be archived within Instrument Manager along with other diagnostic information for long-term archiving if desired.
To find out if instruments you have or plan to acquire supports the transferring of images, go to the Instrument Manager driver listing at drivers.datainnovations.com. Once on the Instrument Manager drivers page, filter by Company or Category to locate the specific instrument driver. Then see if the driver has a ‘Note’ indicator in the far-right column. Click on the note field and if the instrument allows the transferring of images, a message saying ‘This driver processes image files’ will be present in the notes field.

For information related to setup of the driver to transfer images, refer to the instrument help file or contact support at northamerica‐support@datainnovations.com or call 802.658.1955.
Resources:
- Data Innovations Customer Web Site ( drivers.datainnovations.com )
- Specific-Instrument Driver Help File
A Common Critical Rule Mistake
Did you know one of the most common and one of the most critical mistakes in writing rules is forgetting to include the {Is Numeric} operator when evaluating numeric result values as well as processing other mathematical operations.
It is clear that 5 is less than 10 and 15 is greater than 10. But is 'Err' greater than or less or equal to 10? The operator {Is Numeric} is used to determine if the value that is being evaluated is numeric or whether it contains alpha or symbol characters. Consider the following rule example:
IF: ({Result} {On Test} "Test" < "10")
Then: {Set} {Result} {On Test} "Test" = "Neg"
At first glance, the rule would determine if a given test result is below 10, then Instrument Manager™ would set the result to 'Neg' if the statement is true. But what would happen if the instrument malfunctions and sends a non-numeric result instead (e.g. 'Err' or '#####') or concatenates a symbol (e.g. > 50) or changes the numeric to an alpha (e.g. Pos)?
When an instrument sends a non-numeric result (or any result that contains nonnumeric characters), the {Is Numeric} operator is designed to guard against evaluating non-numeric values against numeric values. Without the {Is Numeric} operator, Instrument Manager will assume the value is numeric and convert the string to zero (0) to perform a mathematical evaluation.
Consider the following rewrite of the rule above:
IF: ({Result} {On Test} "Test" {Is Numeric}) {AND} ({Result} {On Test} "Test" < "10")
Then: {Set} {Result} {On Test} "Test" = "Neg"
Including the {Is Numeric} operator will ensure mathematical operations are only performed on numeric values when a numeric value is expected. A numeric value is defined as any combination of the following:
- Integers or whole numbers. One of the finite numbers in the infinite set: [..., -3, -2, -1, 0, 1, 2, 3, ...]
- Integer(s) with a floating-point decimal
- Exponential notation (positive or negative)
Starting in Instrument Manager v8.14.10, the Rules Processing feature will alert user(s) with a message detailing which rules may require the {Is Numeric} operator as a safeguard against unexpected non-numeric values.
Data Innovations recommends users evaluate every rule to ensure whether the {Is Numeric} operator is appropriate, in order to ensure the correct evaluation of result data and processing of mathematical operations.
Important: It is critical that Rules be validated by the user to ensure that the Rules function as they are intended prior to being moved into the Live Rule set and put into practice in the laboratory setting. Refer to the Instrument Manager Rules Manual for additional recommendations regarding testing.
For questions related to {Is Numeric} or Instrument Manager Rules in general, please contact support at northamerica‐support@datainnovations.com or call 802.658.1955.
Resources:
- Instrument Manager - Rules Manual (included with Instrument Manager software)
Changing the Status Screen Refresh Interval for IM
Did you know that in Instrument Manager v8.11.01 and above, you can change the refresh interval of the Status screen to a user-definable amount of time? There are times when you are working with the Status screen when the default update interval of five seconds is too frequent and you need to change the refresh rate to a different refresh interval. The support video will provide you with a step by step demonstration on how to create a custom refresh setting that will allow you to either type in the number of seconds or select number from the options.
For further assistance or if you have questions related to changing the refresh interval of the Instrument Manager Status screen, please contact support at northamerica‐support@datainnovations.com or call 802.658.1955.
Resources:
Tools to Setup Test, Fluid, Instrument ID and Error Codes in IM
Did you know functionality exists to make setting up test, fluid, instrument ID and errors codes in Instrument Manager drivers easier than just hours of ‘heads down’ data entry.
Many drivers come pre-populated with the manufacturer’s defined test (or analyte), fluid, instrument ID and error codes. For these drivers, the fastest way to edit the codes is to use the import / export functions introduced in version 8.12.10 of Instrument Manager.
The import/export functions are accessible for each driver from Instrument Manager’s main menu via Configuration → Configuration Editor → [select driver configuration] → Properties.
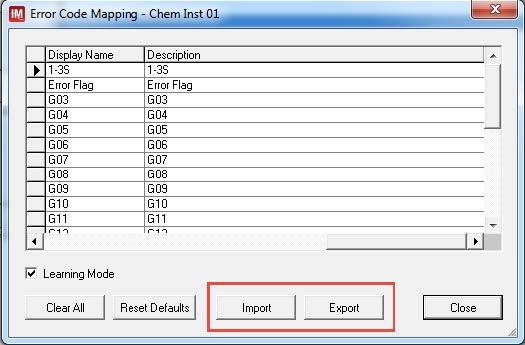
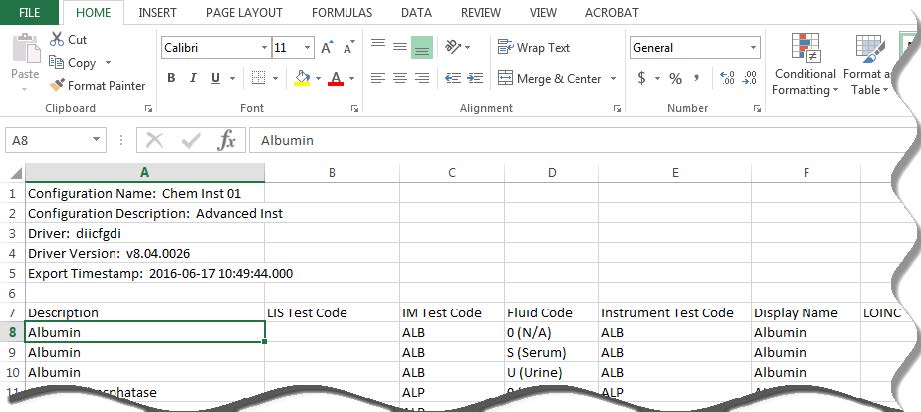
Within each configuration section (Test Code Map, Fluid Code Map, Instrument ID Map, Error Code Map) there is an Export button that allows you to export the respective codes to a text (.txt) file. This file can be edited with Microsoft Excel®, Microsoft Word® or any other text editor you prefer. Once you have completed your edits, ensure you save the file in the text file format and then use the Import button to populate the driver configuration.
If the driver does not have any pre-defined codes, you can enable the ‘learning mode’ of each driver configuration section and as you send information to Instrument Manager, it will build the tables for you. Then you can then use the Import / Export functions defined earlier to make your final revisions.

For assistance with driver test, fluid, instrument ID and error code configuration, please contact support at northamerica‐support@datainnovations.com or call 802.658.1955.
Resources:
- Instrument Manager – Mapping section of the Getting Started Guide (included with Instrument Manager software)
Virtualize Instrument Manager™ using VMware®
Did you know that Instrument Manager v8.11.10 and above can be virtualized using VMware® products. In 2011, Instrument Manager achieved VMware Ready™ status, a designation that indicates Instrument Manager has undergone detailed test procedures and is supported on VMWare vSphere environments and can be deployed with confidence of compatibility for our customers.
Virtualizing often provides organizations with lower costs to deploy new systems or to expand/upgrade existing systems. In addition, it provides lower costs of ownership to support and maintain production environments than stand-alone server implementations.
For assistance questions related to virtualizing your new or existing Instrument Manager system, please contact support at northamerica‐support@datainnovations.com or call 802.658.1955.
Resources:
- Document ID: 11313 - Data Innovations Achieves VMware Ready®
- Instrument Manager - Activate the Software Security Key section of Installer's Guide (included with Instrument Manager software)
Stop Reporting Results if QC Not Run in x Time
Did you know that Instrument Manager™ can monitor the intervals between QC runs and stop reporting results or flag results for one or more analytes if QC results are not received in a user‐defined interval of time. The logic and capability to monitor QC intervals is independent of having a third‐party QC package integrated with Instrument Manager.
| Use Case: | Creates a QC failure if no QC is performed for an analyte in a specified of period |
| If: | {QC Failed for Specimen ID} “QCSample01” {On Test} “GLU” {within} “8” {Hour(s)} 1,2 |
| Then: | {Hold Test for Verification} “GLU” 3 |
| Notes: |
|
Note: Instrument Manager Rules are provided as an example. Customers are responsible for testing and validation of any rule(s) in their system before using in a live environment.
The rule example above assumes you are holding and reviewing exceptions in Instrument Manager. If you are manually reviewing exceptions in your LIS, simply modify the THEN statement to flag the results to be identified in your LIS as being produced outside of the laboratory’s defined QC interval.
The Instrument Manager system must have Specimen Management licensed in order to utilize this functionality.
To ensure you have Specimen Management licensed:
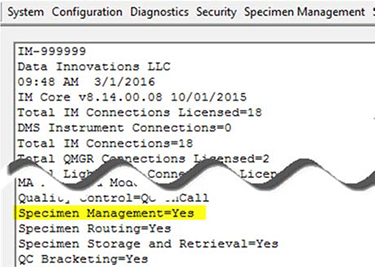
- While logged into Instrument Manager, open Reports‐> License Information from the main menu.
- Ensure the line item Specimen Management is equal to Yes.
See screen shot on right
For assistance with monitoring the interval of QC results, please contact support at northamerica‐support@datainnovations.com or call 802.658.1955.
To maximize the utilization of Instrument and the ability for user‐defined rules, we also offer instructor‐led training. For more information, consult our training page for syllabus and course dates.
Resources:
- Instrument Manager – Rules Manual (included with Instrument Manager software)
- Instrument Manager – Rules Training, training.datainnovations.com
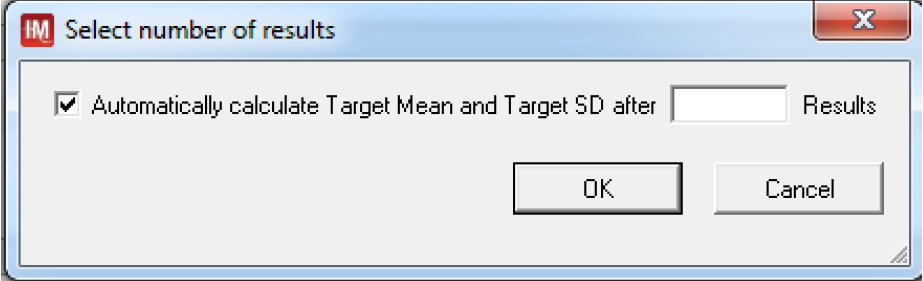
Let MA Automatically Calculate Your Target SD and Your Mean
Did you know that our Moving Averages module will automatically calculate target Mean and target SD using your specific patient data? It only takes minutes to setup a protocol to monitor one or more assays in moving averages but customers often wonder what their initial target mean and target standard deviation should be. Just as laboratories need to establish reference ranges based on their specific patient population, they should also establish their moving averages target mean and target standard deviation based on their specific patient population.
Moving Averages module in Instrument Manager will automatically calculate your initial values for your specific patient population based on a user-defined number of specimens. While creating a protocol to monitor a particular assay.
As you setup a protocol, Instrument Manager Moving Averages module has an option to automatically calculate your target mean and target standard deviation and to define the number of patient results to use to calculate your initial values based on your specific patient population.
You can find this option under Configuration-> Moving Averages Configuration-> Protocol Configuration. Then under any protocols you have setup or are creating, look under Protocol Details section.
For guidance on getting started with Moving Averages, go to http://webinars.datainnovations.com and register for “Getting Started with Moving Averages” webinar or view a previous webinar in the archive section of that same web page.
For assistance with Moving Averages, please contact support at northamericasupport@datainnovations.com or call 802-658-1955.
Resources:
- Instrument Manager – Moving Averages User’s Guide (included with Instrument Manager software)
Cellphone Text Notifications from Instrument Manager
Did you know that every Instrument Manager since v8.06 comes with a module called Notifier that can trigger email, text messages, network notifications and even visual signals via a light pole when Instrument Manager system issues occur?
If you have Specimen Management licensed, you can also have user-defined notifications sent when patient, specimen, and test-level conditions occur.
Customers often ask if we can send these notifications as text messages to cellphones. The answer is yes. When setting up Notifier, rather than entering a work email you would use the cellphone company’s ability to convert an email to text message. The email address you enter is dependent on the carrier and the cellphone number of the person you want to notify. The table below lists some of the major carriers and how you enter an email address:
| AT&T | cellnumber@txt.att.net |
| Verizon | cellnumber@vtext.com |
| T-Mobile | cellnumber@tmomail.net |
| Sprint | cellnumber@messaging.sprintpcs.com |
| Boost | cellnumber@myboostmobile.com |
| Virgin Mobile | cellnumber@vmobl.com |
For example, if your carrier is Verizon and your cellphone number is (123)456-7890, you enter 1234567890@vtext.com. To verify you entered the correct ‘email’, open up your email client on your computer and use this email address to send a test message to the cellphone. If your organization uses beepers or pagers, most beepers support text messaging. Contact your provider for the email address for the respective beeper.
For assistance with Notifier, please contact support at northamericasupport@datainnovations.com or call 802-658-1955.
Resources:
- Instrument Manager – Notifier User’s Guide (included with Instrument Manager software)
- Instrument Manager – Rules Manual (included with Instrument Manager software)
- Web Site: Email To SMS Email Address List
- Web Site: Coghlan Capital
Data Mining with Instrument Manager
Did you know that you can use tools like Microsoft® Excel, Microsoft Access and/or Crystal Reports™ to data mine the information-rich Instrument Manager for data related to your laboratory operations. Starting with Instrument Manager v8.07, customers can use ODBC-Compliant applications such as Microsoft® Excel to data mine for information such as sample turnaround time or instrument utilization to ensure the efficient operations of your laboratory. You can even use this functionality for ad-hoc reporting such as a doctor’s request for the all Troponin results for the last 6 months.
We have provided a document providing step-by-step instructions and a few examples of the type of information you can retrieve from Instrument Manager using applications such as Excel.
Instrument Manager just requires at least one license for ODBC Database Access Connection License (IM-ODBC-01). You can determine if you have a license by going to Reports→ License Report from the Instrument Manager menu. Look for the line ‘Total ODBC Connections Licensed = x’. If x is more than 0 then you have the software requirements to get started.
If you need help getting started, please contact support at northamerica-support@datainnovations.com or call 802-658-1955. If you need to purchase an additional connection you can simply send an email to sales@datainnovations.com or call 802-658-2850.
Resources:
- Data Mining Examples using ODBC with Instrument Manager (Doc ID: 1010)
- Instrument Manager – ODBC User’s Guide (included with Instrument Manager software)
Save Real Patient Examples to Test Rules Against
Did you know that with less than a handful of mouse clicks you can save real patient and specimen examples to test your rules against. We are all familiar with the regulatory requirement to test your autoverification rules at least once a year* or after any changes that could affect the autoverification logic. Starting in Instrument Manager version 8.07, this task is much easier, allowing you to build and save test scenarios to replay these scenarios during and after you have made rule changes or whether it is your annual testing requirement.
To build test scenarios, go to Configuration -> Specimen Management Configuration→ Rules Processing → (Select Connection Configuration) and then Rules Testing section. There you can type in information as if it was received from the LIS or instrument and save that scenario to test against your rules.
To make it easier, you can go to Specimen Event Log (Diagnostics → Specimen Event Log), type in the Specimen ID in the search field. Select System–Data Updated with Specimen Management Info, and then right-click and select “Send Data to Rules Testing”. A dialog box appears asking which connections (e.g. instruments) you want to save these real specimen examples to. Select one or more instruments and click OK. All the parameters for the specimens and patients will be saved in the Test Rules section for the connections (e.g. instruments) you selected. By using the Specimen Event Log to select and send the data, you can select the data in ‘raw’ form that has been mapped but prior to the data being processed by the rules.
Then when using Rules Testing, the saved specimens and all of their associated parameters are available to use as test scenarios.
For assistance with building test scenarios, please contact support at northamerica-support@datainnovations.com or call 802-658-1955.
Resources:
- Instrument Manager – Specimen Management User’s Guide (included with Instrument Manager software). This can be found within the Customer Web Portal in the Downloads section.
- College of American Pathologists (CAP), Laboratory Accreditation Program, Laboratory General Checklist, GEN.43875 Phase II.
Access Instrument Manager Via a Web Browser
Did You Know.that you can access Instrument Manager™ via a web browser or remote desktop shortcut rather than deploying via thin client? Thin client can be time consuming to deploy and when you are planning an upgrade to Instrument Manager software. Microsoft Remote Desktop Web Access (RD Web Access) technology in Windows 2008 Server and Windows 7 allows you to access Instrument Manager via a Web-Browser and simplify and accelerate deployment and future upgrades of Instrument Manager.
For further information related this topic refer to Doc ID: 9013 / Web Browser Access for Instrument Manager (IM).